Mirror World Unity SDK
Mirror World's Official Unity SDK
Getting started
We highly recommend that you download our source code, which includes a sample Demo of the SDK that you can use to build your own programs. -> Source Github:https://github.com/mirrorworld-universe/mirrorworld-sdk-unity
You should have a MirrorWorld developer account,you can register for it at our official site.
Also you need to create project and create an API Key. If you already have an API Key, you may skip this step and proceed to the next one.
Import SDK
Download assets Mirror World Unity SDK.
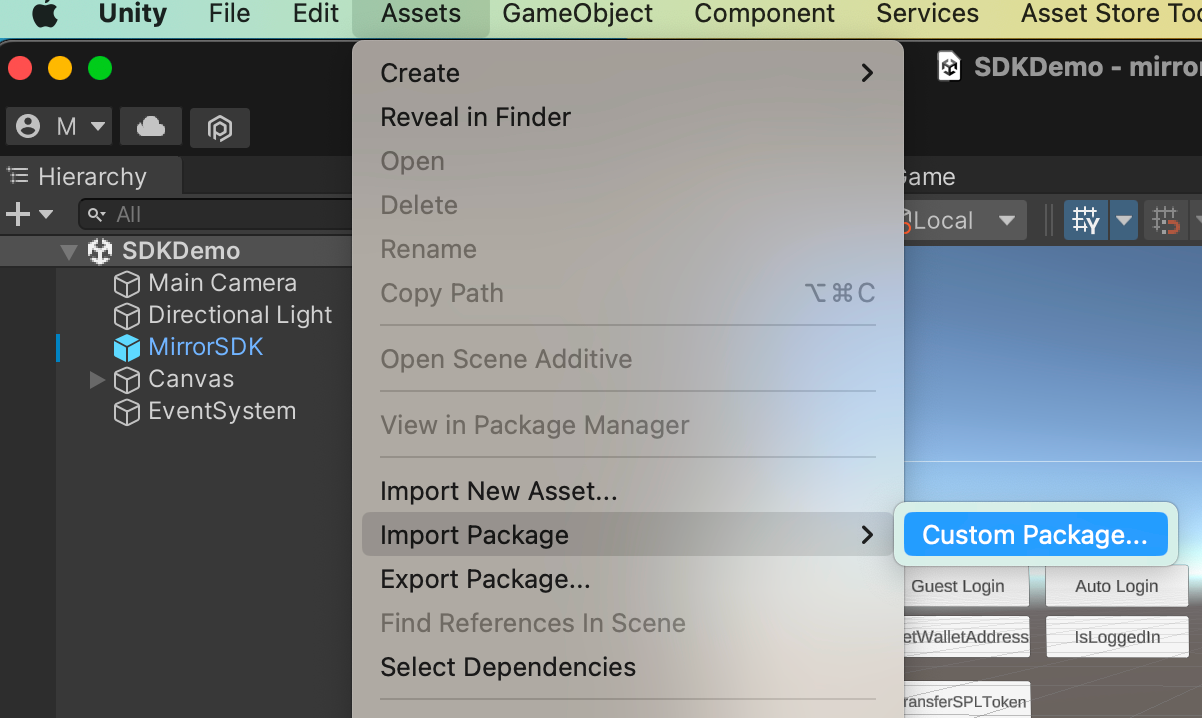
import it to your project Assets > Import Package > Custom Package and select the package you just downloaded.
Usage
Configration
Config with prefab
Drag and drop the "MirrorSDK" prefab located in the MirrorMarketSDK directory into your initial scene and proceed with the configuration.
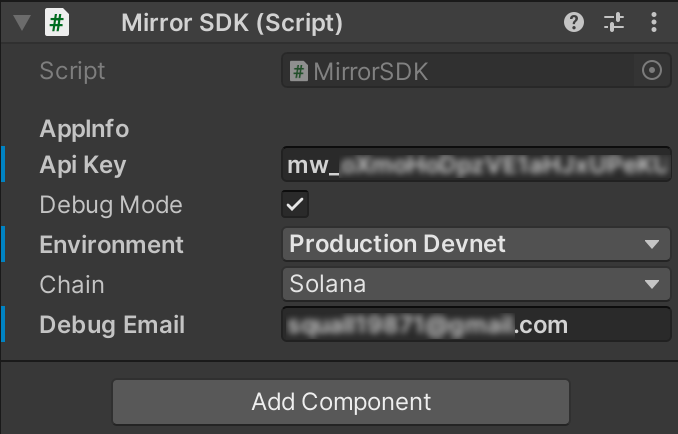
Explanation of beyond image:
- Api Key Input your aky key which requested on https://docs.mirrorworld.fun/ .
- Debug Mode If checking this, you could see all the flow and error notice on console.
- Environment Choose the environment you want to use.
- Chain Which chain you want to work on.
- Debug Email Using for debug. Please input the email which used to register the API key.
Configration dynamic(Not recommend)
We strongly recommend configuring the SDK by dragging and dropping the prefab. However, if you prefer not to do so, you can init Mirror World SDK with the following code:
GameObject mirrorObj = new GameObject("MirrorSDK", typeof(MirrorSDK));string apiKey = "your api key";MirrorChain chain = MirrorChain.Solana;bool debugMode = true;MirrorEnv env = MirrorEnv.Devnet;MWSDK.InitSDK(apiKey, mirrorObj, chain, debugMode, env);
Login
And then,if you want to call some API of SDK in your app,you should lead users to login first.
- Call up login page
If you want him to login(or again), you can use the following code:
MWSDK.StartLogin((loginResponse) => { Debug.Log("Login result:" + JsonUtility.ToJson(loginResponse));});
StartLogin is a client API, so you don't need to concern about chain. But for most API, you need to use different instance on different chain. Normally, they are MWSDK.chain_name. You can refer to our documentation website to find out which functional module each API belongs to.
For convinience, we will use Solana as default at following code.
And if you want to do something after the logining is successful,you can pass an action to it as follows code:
MWSDK.StartLogin((isSuccess)=>{ if(isSuccess){ Debug.Log("Login success!"); }else{ Debug.Log("Login failed!"); }});
- Check if use needs to login. When a user opens your app, you may want to know whether this user has logged in before,instead of letting him login every time, you can call the following code to know that.
MWSDK.IsLoggedIn((isLoggedIn) => { Debug.Log("If he is logged in:" + isLoggedIn);});
Open wallet
User may want to check their wallet in your app,you can open their wallet by following code:
MWSDK.OpenWallet(() => { Debug.Log("Wallet logout callback runs!!");});
If you want to do some operation when user clicked logout button in wallet page, passing 'logoutAction' to this function would be ok.
Confirmation
When we call some API of SDK, you are allowed to pass a param named 'confirmation' to it. You can use all the confirmation we provide in 'Confirmation' enum. Here is an explanation for every kind of them:
Default: If you pass this kind of confirmation to an API,it will use a default confirmation to handle this call,most of the time,it equals 'Confirmed'.Finalized: If you use this, API will wait for Solana to confirm the transaction before returning the HTTP response to you. So the time will be longer more or less.Confirmed: It is a fairly quick response to the user and is a reasonable promise that the transaction if processed, will be eventually finalized after a certain number of confirmations by the validator network.Processed: The node will query its most recent block. Note that the block may still be skipped by the cluster.
Tips: If you want to obtain the complete information of an on-chain operation, please make sure to use "Finalized." For example, when calling the "MintNFT" method, if you don't use "Finalized," the returned result will not include the "transaction_hash" field.
Package
You need to do some configuation if you want to package your app.
Android
Switch to Android platform Find File -> Build and settings -> Choose Android platform (If you are not) -> Click switch platform button.`
Edit Androidmanifest.xml Find:File->Build and settings->Player Settings->Publishing Settins->Build->Custom Main Manifest
Check it, and you may see the path of this file.Let's edit it.
Add permission of internet.
<uses-permission android:name="android.permission.INTERNET" /><queries> <intent> <action android:name="android.intent.action.VIEW" /> <category android:name="android.intent.category.BROWSABLE" /> <data android:scheme="https"/> </intent></queries>
Register this activity
<activity android:name="com.mirror.sdk.activities.RedirectActivity" android:exported="true"> <intent-filter> <action android:name="android.intent.action.VIEW"/> <category android:name="android.intent.category.DEFAULT"/> <category android:name="android.intent.category.BROWSABLE"/> <data android:scheme="mwsdk"/> </intent-filter></activity>
So, the finnaly file would looked as this:
<?xml version="1.0" encoding="utf-8"?><manifest xmlns:android="http://schemas.android.com/apk/res/android" xmlns:tools="http://schemas.android.com/tools" package="com.mirror.mirrorworld_sdk_android"> <uses-permission android:name="android.permission.INTERNET" /> <queries> <intent> <action android:name="android.intent.action.VIEW" /> <category android:name="android.intent.category.BROWSABLE" /> <data android:scheme="https"/> </intent> </queries> <application android:allowBackup="true" android:dataExtractionRules="@xml/data_extraction_rules" android:fullBackupContent="@xml/backup_rules" android:icon="@mipmap/ic_launcher" android:label="@string/app_name" android:networkSecurityConfig="@xml/network_security_config" android:roundIcon="@mipmap/ic_launcher_round" android:supportsRtl="true" android:theme="@style/Theme.Mirrorworldsdkandroid" tools:targetApi="31"> <activity android:name=".MainActivity" android:launchMode="singleTask" android:exported="true"> <intent-filter> <action android:name="android.intent.action.MAIN" /> <category android:name="android.intent.category.LAUNCHER" /> </intent-filter> </activity> <activity android:name="com.mirror.sdk.activities.RedirectActivity" android:exported="true"> <intent-filter> <action android:name="android.intent.action.VIEW"/> <category android:name="android.intent.category.DEFAULT"/> <category android:name="android.intent.category.BROWSABLE"/> <data android:scheme="mwsdk"/> </intent-filter> </activity> </application></manifest>
Edit laucherTemplate.gradle Use the same function to open your laucherTemplate.gradle file. Add this to dependencies:
implementation 'androidx.browser:browser:1.3.0'
So the finnal dependencies may like this:
apply plugin: 'com.android.application'dependencies { implementation project(':unityLibrary') implementation 'androidx.browser:browser:1.3.0'}
Edit gradleTemplate.properties Add these to the end of the file:
android.useAndroidX=trueandroid.enableJetifier=true
Besides, you can refer to Android Document to get more information.
iOS
Build your xCode project Find File->Build and settings->iOS->Switch Platform->Build
Add Mirror World Framework Open the build xCode project. Select your project root->TARGETS/Unity-iPhone->Build pharses->Copy Files Change the destination to "Frameworks" and click "+" button to add MirrorWorldSDK.framework to your project.
Edit UnityAppController.mm First, add this import to head of the file:
#import <MirrorWorldSDK/MirrorWorldSDK-Swift.h>
Second, add this to openUrl function:
[[MirrorWorldSDK share] handleOpenWithUrl:url];
So, finnaly your openUrl function may looked like this:
- (BOOL)application:(UIApplication*)app openURL:(NSURL*)url options:(NSDictionary<NSString*, id>*)options{ id sourceApplication = options[UIApplicationOpenURLOptionsSourceApplicationKey], annotation = options[UIApplicationOpenURLOptionsAnnotationKey]; NSMutableDictionary<NSString*, id>* notifData = [NSMutableDictionary dictionaryWithCapacity: 3]; if (url) { notifData[@"url"] = url; UnitySetAbsoluteURL(url.absoluteString.UTF8String); } if (sourceApplication) notifData[@"sourceApplication"] = sourceApplication; if (annotation) notifData[@"annotation"] = annotation; AppController_SendNotificationWithArg(kUnityOnOpenURL, notifData); [[MirrorWorldSDK share] handleOpenWithUrl:url]; return YES;}
The best practices
If you have any questions, please feel free to contact us at any time. However, there are some best practices for the SDK that can fully utilize the product features, so we strongly recommend that you take a look at our sample demo.
Full API Documentation
You can view the documentation for Mirror World SDK for Mobile on our Official Documentation Site
Edit this page on GitHub